
Caroline Sosebee is a Senior Software Engineer at ThreeWill. She has 30+ years of software development experience and a broad scope of general IT knowledge. At ThreeWill she has a proven track record of quality consultative and software development skills, focusing on the design and implementation of SharePoint solutions, both on-premises and in the Microsoft 365 cloud.
Why yes, you can create a CSV file from SharePoint data, or any other data source to which you can connect, using Power Automate Flow. Nice!
One of our clients had a need to export certain data stored in SharePoint for later importing into another analysis tool, so we designed a nifty little (not little) workflow for them. I’ve outlined here the key actions needed to create a file but have left room for you to determine the right fit with your own needs and processes. I also recommend checking out one of my other blogs, Power Automate Flows – Random Tips, Tricks, and Pain Points, for some pointers before you get started, especially if you are new to Flows. It will be a help, I promise.
Pulling Lists
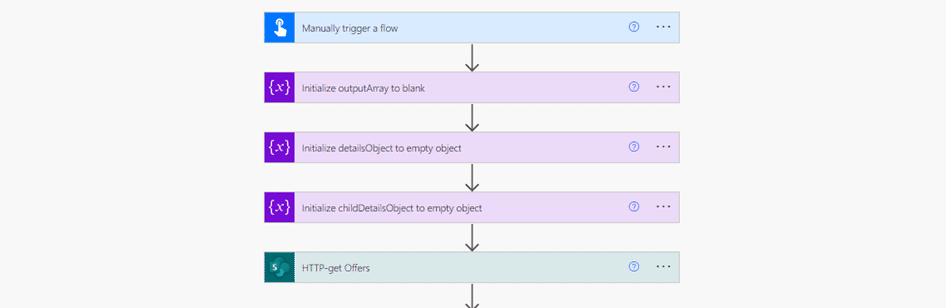
In this example, I’m pulling data from two SharePoint lists, a parent and child, and then merging the data together so that there is one parent item and one child item per line. To do this, we first need to define 3 primary variables, one of an Array type and two of an Object type.
Mine are:
- outputArray – this is the master data container and will have an object for each line of the file. The variable type is Array and should be initialized to blank.
- detailsObject – this variable will hold the merged parent and child data for each item being processed. The variable type is Object and should be initialized to an empty object using ‘{}’.
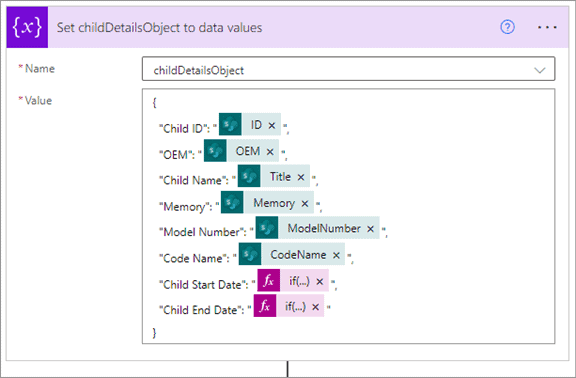
- childDetailsObject – we also need a variable to hold our child values that will be merged into the detailsObject. The variable type is Object and should be initialized to an empty object using ‘{}’.
![]()
Once we have the variables set, we next query the SharePoint parent list and begin building out a data object. I use the SharePoint ‘HTTP request …’ action here to return the data. When needing a discrete set of data, I find making a direct HTTP call much simpler and easier to control than using the ‘Get items’ action. While the ‘Get items’ action is very handy in some situations, being in control of exactly what I want to return is best for this application.
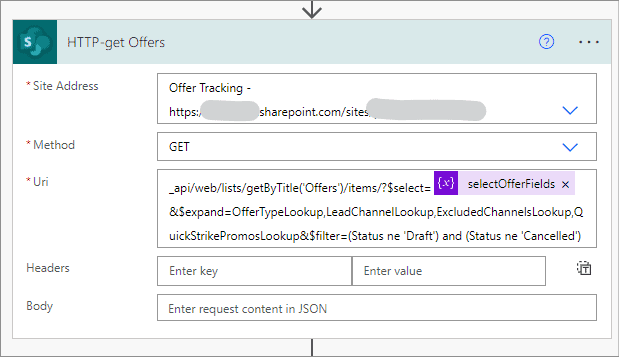
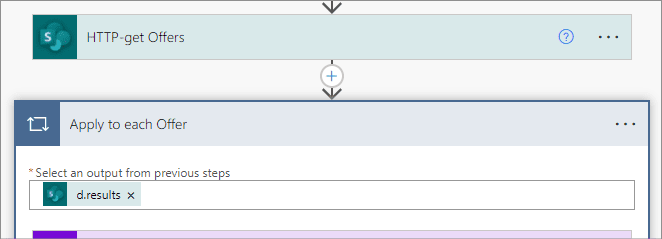
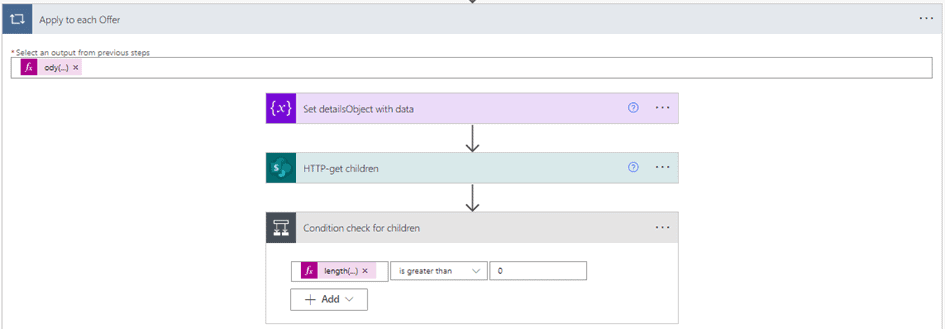
Now that we have the parent data, let’s loop through it and pull the children. For this, we’ll use an ‘Apply to each’ action using the results from the HTTP call. It’s important to note the data structure returned by an HTTP call as we’ll be using this in some of our actions to help avoid the extra ‘Apply to each’ loops that Microsoft will sometimes ‘helpfully’ insert for you.

By knowing this structure, we can set the data source for the ‘Apply to each’ action manually using the Expression tab instead of selecting from the Dynamic content tab.
The value should look something like this: body(‘HTTP-get_Offers’)[‘d’][‘results’]
This will turn into what you see below (d.results) after a save. Note that this string refers very specifically to the name of the HTTP action (‘HTTP-get_Offers’) used to get our results. You will need to update your string to match the name of your own HTTP action (or other data calls). Another tip to note is that the internal name of any action will contain underscores in place of any spaces, so watch for this when updating to match your own value.
Set Variables
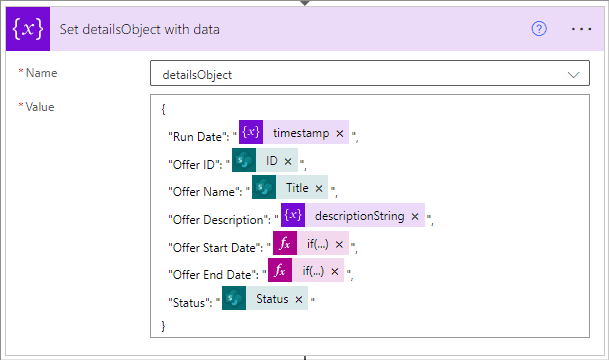
Within the Apply to loop, we now use a ‘Set variable’ action to set the detailsObject with the fields pulled from the parent source. This serves as an initialization/reset of the detailsObject as we loop, we know we aren’t dealing with stale data. Note that in this example, I’ve chosen to use static data to build out my objects. There are ways to dynamically add properties to your object instead of treating them all as static values. I’ll address adding dynamic values in a follow-up post.
Now we run a query for any child items, based on the ID of the parent. This is another HTTP call to SharePoint so we have ultimate control. Since the parent may not always have children, we first check to ensure we returned some items using the Condition action. And once again, I build out the expression manually, which should look something like this:
length(outputs(‘HTTP-get_children’)?[‘body’][‘d’][‘results’])
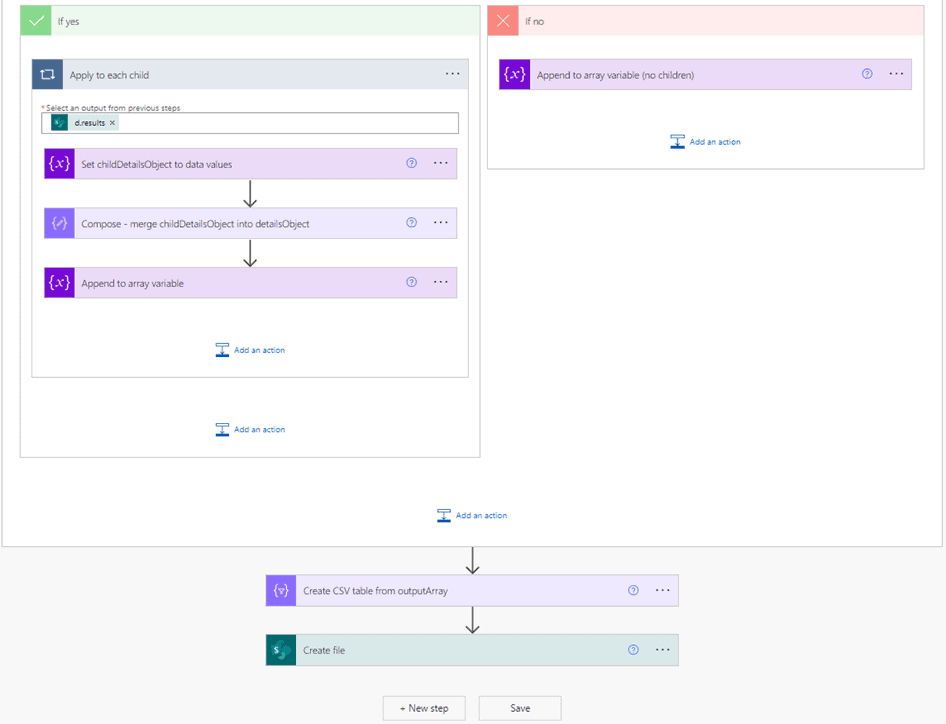
If we have children, we start the loop to process each child. If we have no children, then we simply append the detailsObject to the outputArray variable using the ‘Append to array variable’ action and continue to the next parent item.
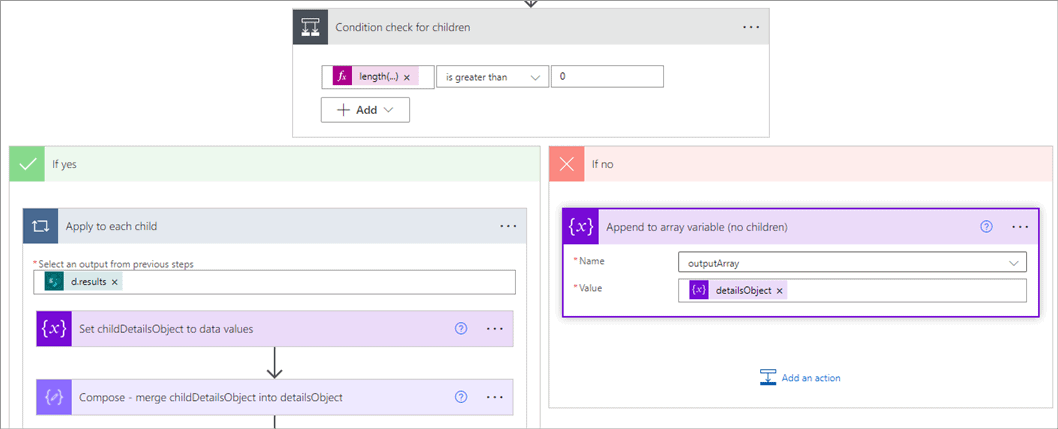
For the child loop, we start by loading the childDetailsObject with data in the same way we built out the detailsObject for the parent, using a ‘Set variable’ action.
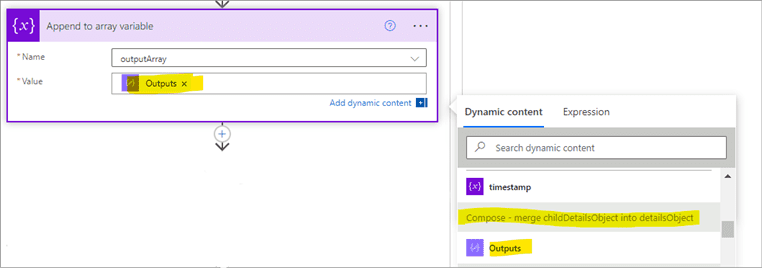
We now merge the parent and child objects together using a ‘Compose’ action and the union function. The union function is found using the ‘Expression’ tab and takes our two objects as input.
union(variables(‘detailsObject’), variables(‘childDetailsObject’))

We then use the output from Compose and append it to the outputArray variable using the ‘Append to array variable’ action. This will add the object as the last item in the array.
We repeat this process until we have looped through all the parents and their children and added them to the outputArray variable.
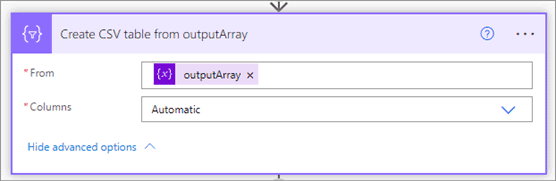
It is now time to save the data. To do this, the ‘Create CSV table’ action is used to convert the ‘outputArray’ variable into a table format. The Columns value is set to ‘Automatic’ which will take all the key/value pairs it finds in the array and turn them into individual columns. For simple exports, a value of Custom can be selected instead, and you can manually specify what the columns should be. I have not ever used this so will leave it for you to explore further.
Create CSV File
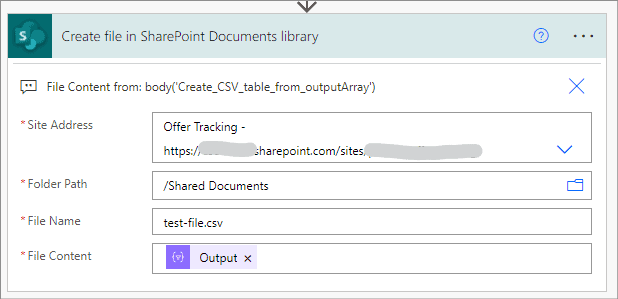
The SharePoint ‘Create file’ action is then used to save the newly created table to a file with a ‘CSV’ extension into the Shared Documents library. Once the Flow completes, you should find a fully formed CSV file in your destination library.
Conclusion
Simple enough! Of course, creating a file can get much more complex based on things such as the initial data source, the requirements around the location for saving the data, whether it should be built with dynamic fields, etc. It can also be as simple as what is shown here, which should get you started just fine. I hope you enjoy and find this helpful!
For reference, here is a quick view of the flow showing all the steps mentioned above.
CONTACT US TO LEARN MORE ABOUT CREATING CSV FILES USING POWER AUTOMATE!