
Caroline Sosebee is a Senior Software Engineer at ThreeWill. She has 30+ years of software development experience and a broad scope of general IT knowledge. At ThreeWill she has a proven track record of quality consultative and software development skills, focusing on the design and implementation of SharePoint solutions, both on-premises and in the Microsoft 365 cloud.
[Note: this post was originally published June 15, 2021, and was updated in April 2022.]
Power Automate Flows – Random Tips, Tricks, and Pain Points
I’ve recently had the opportunity to dig pretty deep into Power Automate on a project where we had to convert 18 SharePoint 2010 workflows into Power Automate Flows. It was definitely an eye-opener, so I thought I would share some of the tips, tricks, and pain points we encountered during the conversion. Note that I will be referencing SharePoint here but most of these should apply to any Flow.
Tips
Time
Converting/building a Power Automate Flow WILL take you longer than you expect. Unless it is truly as simple as adding a ‘Send an Email’ action and saving, of course. Even by the time I got to the 18th workflow and was working on bugs, it would still take time to figure out the correct expression to use or the correct syntax to do what was needed.
Expressions
Take the time to get familiar with the common function expressions and the syntax used by these expressions. Even though there are a lot of out-of-the-box expressions for you to choose from, you will still often find yourself needing to write your own or tweak the one provided.
Types of Fields
Also, take the time to understand how Power Automate returns values for different types of fields as each type is handled differently. And the options provided may also vary based on the variable type you are using. I found the easiest way to figure this out is by creating a test list with all the field types on it, then creating a flow that does nothing but set variables to the different value options returned by SharePoint. For some reason, I found dealing with multi-choice fields to be the most challenging for me.
A good starting resource for this is Pieter Veenstra’s excellent post Getting SharePoint field values in Power Automate. It is a little dated, but I found the bulk of the information to still be relevant.
Variables
Use lots of variables, named in a meaningful way, and initialize these at the top of your workflow. One of the most useful ways to take advantage of variables is to ensure any static value used within your workflow is set in one. This makes copying and reusing a workflow much simpler.
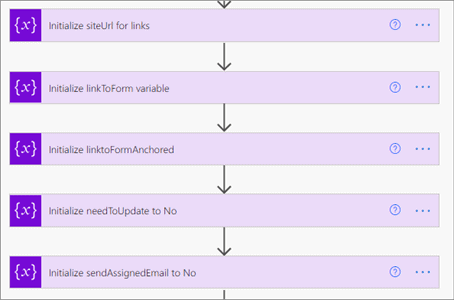
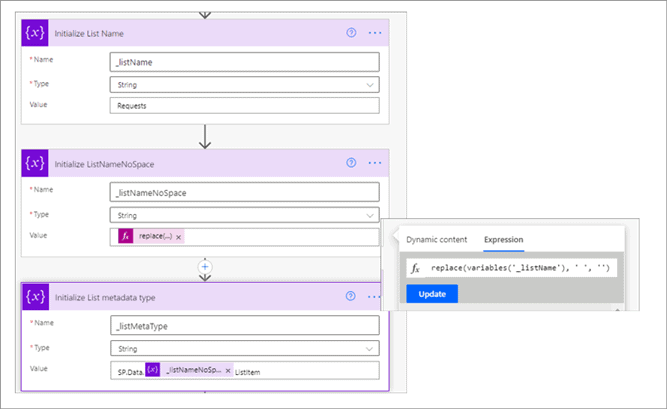
To me, the most important static values to put into a variable are list names, both with and without spaces, and a metadata type string. We use these heavily within our workflows for HTTP calls to SharePoint. It may seem unnecessary at first until you decide to use that workflow as a basis for another. Then it becomes the smartest thing you’ve ever done.
Used like this:
Other values that are handy to have in a variable are:
siteUrl – can be used in various links
first(split(triggerOutputs()?[‘body/{Link}’],’/_layouts’))
linkToForm – handy when lots of emails with links are being sent in a workflow
concat(variables(‘_siteUrl’),’/SitePages/FormNameHere.aspx?fdrid=’,triggerOutputs()?[‘body/ID’])
anchoredLinkToForm – takes the previously built link and wraps it in an anchor element so you can control the text shown
concat(‘<a href=”‘,variables(‘_linkToForm’),'”>click here</a>’)
needToUpdate – flag used to indicate that an update is needed. This will help prevent unnecessary update calls.
Power Automate Limitations
After all my talk about using lots of variables, keep in mind that Flows do have limits on the number of actions (API calls) that can be executed during a specific period of time. When Microsoft determines that you’re trying to do too much, it will throttle your Flow automatically and show an error about slow performance.
I would recommend getting familiar with your or your user’s license limits so you can plan accordingly when building a Flow. And besides,, who doesn’t love trying to sort out Microsoft licensing and limits? It’s what we all dream about doing, right?! Ugh.
I would recommend reading these articles: Limits and configuration, Request limits and allocations and Troubleshooting slow running flows.
Names
Clearly name every variable and action you add to the flow! I cannot tell you how helpful this will be when you go back in to make a change or try to figure out what is going on. The name of an Action is also very important to the Flow itself, which is JSON-based. A good example of this is when using an ‘Apply To Each’ action which loops through a field or variable and then does something with the value.
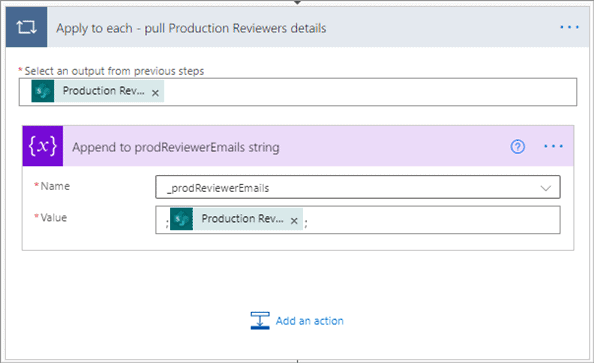
The above action is looping through all the people in the Production Reviewers SharePoint list column (people picker) and building out a string of email addresses to later be used when sending an email. At first glance, it seems to be fairly simple but if you look at the field referenced in the Append Value field, you will see that it translates to this behind the scenes:
@{items(‘Apply_to_each_-_pull_Production_Reviewers_details’)?[‘Email’]}
Notice how it is not referencing the SharePoint field directly at this point but is referencing the output from the ‘Apply to each’ loop by using items(‘Apply_to_each_-_pull_Production_Reviewers_details’). The ? [‘Email’] reference is telling it we only want the email address from the output.
Notes
Did you know that there is a note field associated with each action? It is a very handy thing and I highly recommend using it as often as possible. It can be found under the ellipsis next to the action name.
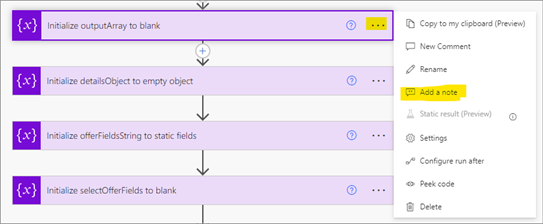
Once clicked, it will open up a Notes field under the action name that you can use for anything you think will be useful in the future. It will show anytime you expand the action and is easily clearable using the provided clear icon.
One of the primary things I tend to use it for is to hold the expression I built for that field. For me, it makes it much easier to see and understand the formula at a glance, instead of holding a hover over the field or going back into the Expression Builder, which has a way too small text field associated with it, to view it.
It can also be used to hold a description or explanation of the purpose of this action, which can help someone coming in cold to work on the Flow. Or you, 6 months from now, when you don’t remember what it is supposed to be doing. Not that that would ever happen to any of us! 😊
Tricks
List Names
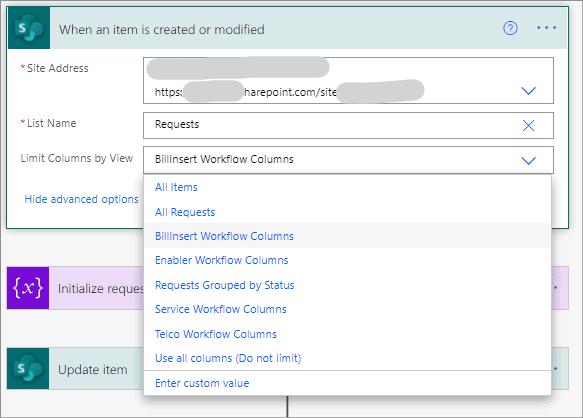
When setting a SharePoint trigger action, such as ‘when an item is created or modified’, do not select the list from the dropdown provided but select ‘Enter custom value’ and type in the list title yourself. This will make it much easier when moving a flow between environments. When selecting a value from the dropdown list, the value stored in JSON is the actual GUID (unique id) of the list selected. Since this is typically different across environments, it will fail on import. If you manually type in the list name yourself, then the list title is what will be stored internally in the JSON.
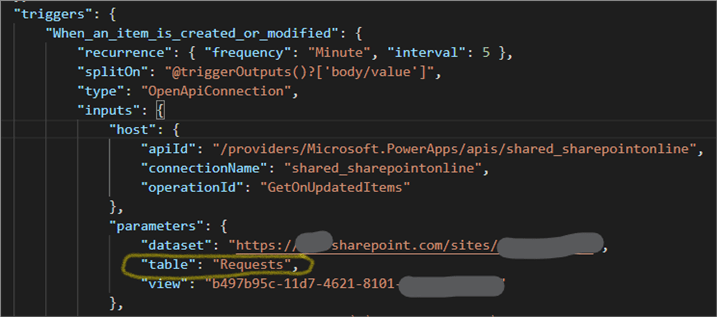
It is a different story for a “view” reference, as shown above. Whether you type in the name as a custom entry or not, the GUID will always be saved. Definitely, a pain point when deploying across environments!
Trigger Conditions
YES! You CAN trigger a Power Automate flow on a specific content type! For this project, we had a single list with 4 content types and had workflows specific to each type, so we needed to find a way to start only the applicable workflow when an item was added or modified.
We found the simplest way to do this was by adding a Trigger Condition on the SharePoint action being used to start the workflow, in this case, ‘When an item is created or modified’. In this Trigger Condition, we check the content type of the triggering item against a string value containing the name of the content type.
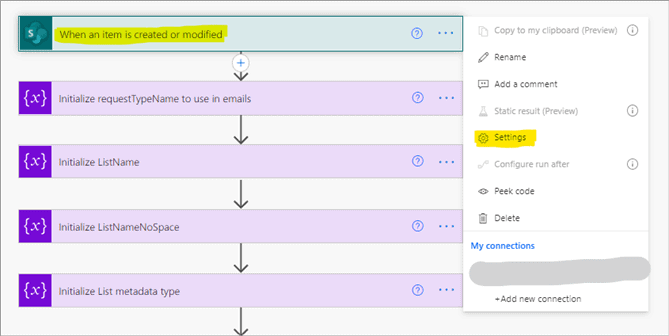
To find Trigger Conditions, click the ellipsis on the action and select Settings:
Here you will need to add a trigger expression that references the built-in Content-Type field:
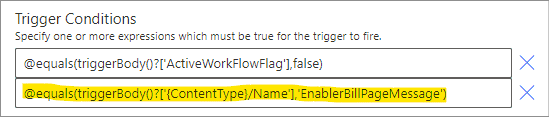
Trigger conditions have to be coded manually (no handy expression builders here) … yet another reason to be familiar with expression syntax. A trigger condition must evaluate to TRUE or FALSE so that the workflow knows whether it should start. In the above condition, we are saying: if the content type name equals ‘EnablerBillPageMessage’, return TRUE. If TRUE is returned, the workflow will start, otherwise, it will not. Simple, right?
Note that I do have a second condition in this particular flow to ensure it does not start if a workflow is already running on this item (such as an approval workflow). When using multiple conditions on an action, ALL expressions must evaluate to TRUE for the workflow to start. And, since the workflow is stopped by the trigger condition, it will not show in Workflow History since it technically never started.
Pain Points
Looping
When a workflow needs to update the item that triggered it, say to set a flag or status, it WILL retrigger that same workflow, causing a massive looping mess. Luckily, some folks smarter than me have come up with a generic workaround to stop this, though it is a little bit painful to implement.
In a nutshell, this is what is required:
- A new column of type numbers to use for comparison.
- Versioning needs to be turned on in the list/library.
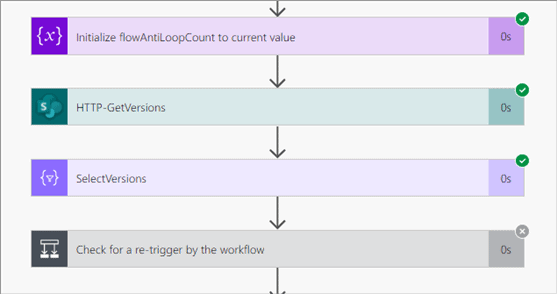
- The new number field will need to be incremented in the workflow and then used for comparison to the previous version to tell how the Flow was triggered.
One drawback is that there will always be two runs of the workflow for a single update done in the UI. The first run will be the one that actually does the work and the second run just checks and stops at the version comparison:
I’m not going to go into deeper detail here as that would be a blog post in and of itself and has already been nicely documented by Ram Prasad in this blog – How To Stop MS Flow From Re-Triggering On An Item Created/Modified Trigger. Thanks, Ram!
List View Thresholds
List View Lookup Threshold … some of the most dreaded words in the SharePoint world. In SharePoint Online this limit is 12 and encompasses the following column types:
- Standard lookup fields
- Managed metadata fields
- People or group columns (including Created by and Modified by)
- Workflow Status columns
- Fields that are linked, such as ‘Title (linked to item)’ or ‘Name (linked to Document), Type icon for documents, and other system-generated links
When creating a Flow that runs against a SharePoint list or library, there is the possibility of hitting this limit. My understanding is that when the triggering action runs on a create or update, the first thing it does is pull in all the fields and their values for that item. If there are tons of lookup-type fields then the workflow will throw an error, which I have definitely encountered.
Luckily, there is a way to combat this by using the ‘Limit Columns by View’ field found under the Advanced Options link. To use this feature, you will first build a view on the list. Be sure to include ALL the fields you need to reference in the workflow, as only the ones in the view will be selectable. If you need values from 12+ lookup-type fields for this flow, you will likely need to start with a small view on the triggering call, then perform multiple ‘Get Item’ calls, using different views for each, to get the rest of the fields. I personally have not had to create multiple calls to get the data I need so there might be a better way, but I think this would be a viable solution. Once you have your view created, you can select it from the list provided and the workflow should proceed normally.
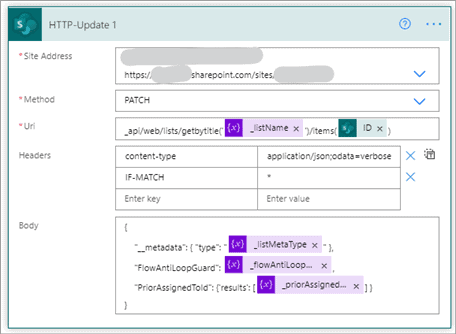
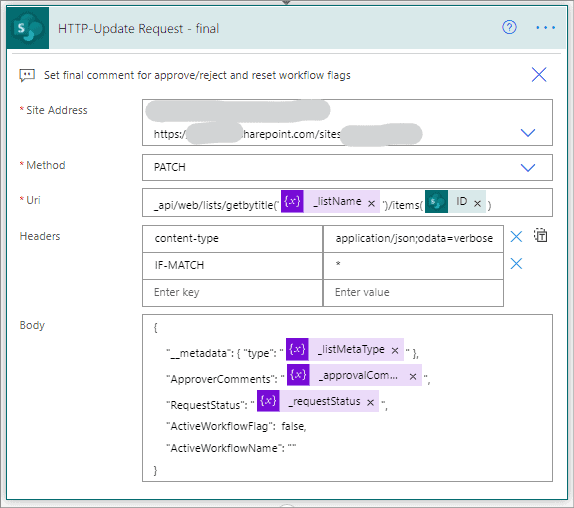
One thing to note is that if you are going to use the SharePoint ‘Update item’ action, you will hit the same threshold limit, so be sure to also include any fields that need to be updated in the view and then add the view to the update action. If the limit is hit by adding the fields to be updated, a better option might be to consider using the ‘Send an HTTP request to SharePoint’ action and build out your own update call using some of those nifty variables you built earlier. We tend to do all our updates like this as it seems more efficient and we have total control over what we are updating:
Summary
I hope some of these help you along your Power Automate journey … it can be a doozy! But it can also be fun as well and is definitely worth digging into learning. Enjoy!
For some more great pointers on Power Automate, be sure to check out Bo George’s great article, Tips & Tricks For Exporting and Importing Flows between Environments.
CONTACT US TO LEARN MORE ABOUT MIGRATING OR CREATING POWER AUTOMATE FLOWS!


2 Responses
Hi, good read 🙂
For static variables I often use a Parse JSON action, then I can initialize several variables in one go.
Also for the SharePoint list changes, there is a action: “Get changes for an item or a file” that is quite useful.
Hi … thanks for the extra tips! I had heard about using JSON for variables but haven’t tried it yet. I’ll have to give it a go on my next Power Automate project. I’m also glad to know about the ‘Get changes for an item or a file’. Yet another one I haven’t tried. There is SO much you can do in Power Automate!